Getting started
To get started using Pfeil, you’ll need to:
Create a new deck.
Add cards to the deck.
(Optional) Adjust deck settings.
Start using your deck!
Creating a new deck
If you are in the card practice menu, press
View decksto enter the deck overview menu.Select the deck type you want to create from the drop-down, then select
Create new deck. See the different deck types in Decks.
Adding cards
If you are in the deck overview menu, click on the name of the deck you want to edit to enter its card practice menu.
From the card practice menu, select
Edit deckto enter the edit deck menu.If nothing happens, it’s possible that you aren’t currently in a deck. Navigate to the deck overview screen with
View decksand select a deck, or follow the instructions in Creating a new deck and then try again.
Locate the type of card you want to add, if there are multiple, and then expand the
Add, edit and remove cardsmenu.Please read Setting up cloze cards if you are planning on using cloze cards in your deck.
Press
Add anotherto create a new, blank card.The card has its own menu with settings related to its card type. You can reveal the card menu by clicking on the card.
Important
In order to save the newly added cards to your deck, you must click Save and close before leaving the page.
You should now see cards in the card practice screen. See Answering cards to start using your new deck!
Multiple prompts and/or answers
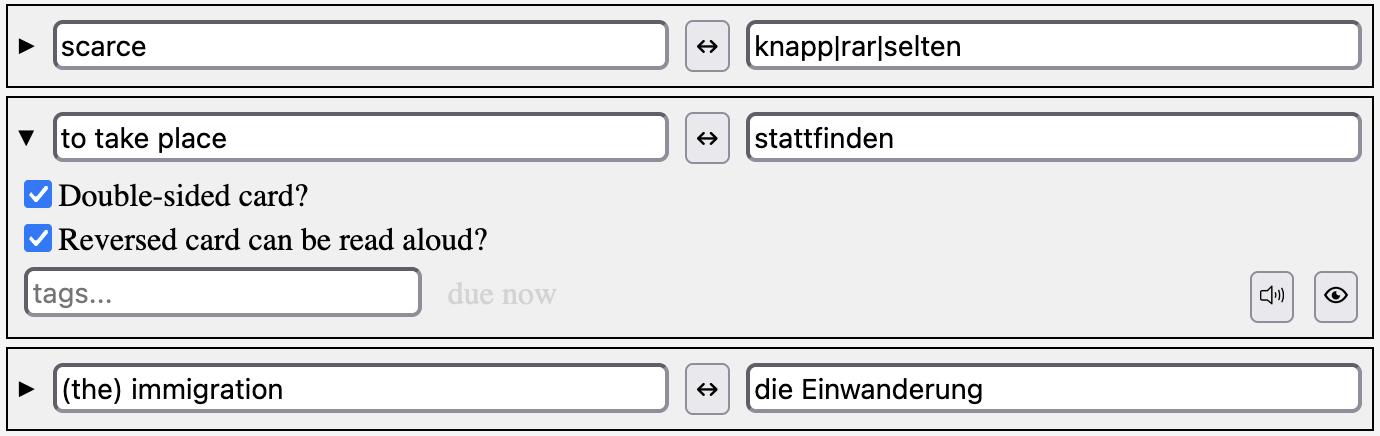
The bar character | can be used to list multiple correct answers. Any of these possibilities will be accepted as a correct answer, and they will all be listed out in the hint box if a card is answered incorrectly.

If you are using two-sided cards, the first value will be displayed as the only prompt. Check out the Card templates in Configuring deck settings (advanced) to see options for listing multiple prompts on a card.
Answering cards
Read or listen to the given prompt. If the card is audio-only, press the speaker icon to play the audio.
Type your guess at the answer in the text box.
Press
Enterto submit your answer.Press
Up Arrowto mark a card as correct, overriding a previous incorrect answer.Press
Down Arrowto skip a card and receive a new one, ignoring any previous answer.
Customizing your deck
These are some basic settings which allow you to enable or disable certain deck features. Further customization is possible and is covered in Configuring deck settings (advanced).
Configuring deck settings (basic)
The deck settings are located in the Edit deck menu. Different types of decks have different possible settings (see Decks), and thus you might not see all of the following settings in your deck.
Enabling Text-to-speech
Enabling text-to-speech (TTS) will make it so that the cards you add will be read out loud by the selected speaker.
In the
Edit deckmenu, check the box next toSpeak correct answers using text-to-speech?to enable TTS.Select a speaker. Make sure to pick a speaker listed for the language of your second card side (the side with your answers).
Adjust the speech rate (and pitch) as needed.
Note
There are many TTS voices pre-installed on Mac, but Windows does not have as wide of a selection installed by default. You can download additional voices for each language through the OS settings.
Enabling reverse-side quizzing
If desired, you can allow your two-sided cards to be shown in either direction. This means that sometimes you’ll get side 1 and have to provide side 2, and sometimes you’ll get the opposite.
In the
Edit deckmenu, check the box next toStudy both sides of two-sided cards?.If you’ve enabled TTS (see above), you can opt to let reversed cards show up as audio-only cards in addition to (or instead of) regular text cards.
With this setting, a speaker button will appear in place of the text on the card. When you press the button, you’ll hear the TTS read side 2 of the card, and you’ll then have to provide side 1.
If desired, adjust the probability of a reversed card being audio-only.
Setting up cloze cards
To set up cloze cards, you’ll need to fill the available fields with these four values:
The cloze server,
https://cloze.narfnilk.com/Abbreviation of the language you want to use as a reference (such as your native language)
Abbreviation of the language you want the puzzles to be generated with
A list of the data sets you want to include (leave this field blank if you want to include all existing data sets)
Once you set up the cloze server, you can click on Save and close to begin the card generation. Pfeil will then fetch cloze puzzles for each of your words from the cloze server, which will take a few moments (you might see a spinning loading icon in place of a card).
Note
After the initial server setup, changes to the cloze server settings won’t take effect until you re-fetch the server. This can be done by simply reloading the page (just make sure you’ve already hit Save and close).
Additional deck controls
Exporting an existing deck
If you are in the deck overview menu, click on the name of the deck you want to export to enter its card practice menu.
Select
Export deck. The deck will automatically export as a json file and save to your default downloads folder. You can view the data in the deck file by opening it in any text editor.
Importing an existing deck
There are two ways to import a card deck. To import a deck as a new deck:
If you are in the card practice menu, press
View decksto enter the deck overview menu.Select
Import Deckand select the deck file you wish to import. You should now see your imported deck.
To import a deck that overrides an existing deck:
If you are in the deck overview menu, click on the name of the deck you want to override to enter its card practice menu.
Select
Import deckand select the deck file you wish to import. You should now see that your imported deck has replaced the existing deck. You can verify this by enteringEdit deckand viewing its cards.
Note
Incorrectly formatted deck files can cause weird, undefined behavior. If your cards are missing or you can’t enter the edit deck menu, check your deck file for possible json formatting errors.
Configuring deck settings (advanced)
The deck settings listed here are referred to as “advanced” simply because they don’t provide any additional functionalities, so the average user might not care to tweak them.
Study [due/new] cards, then [new/due] cards:
This setting can be set to prioritize either due or new cards, or only study one set. If you enable this setting, cards will be seamlessly inserted into your queue as they become available.
Card template:
This setting contains the HTML code which determines how the cards are styled. This template is completely customizable. More details and sample templates coming soon.
Card substitution settings:
These settings allow you to create variables of strings which will be substituted at the time the card is generated. This feature is especially useful for creating lists which can be used in conjunction with randomization blocks to generate semi-random cards.
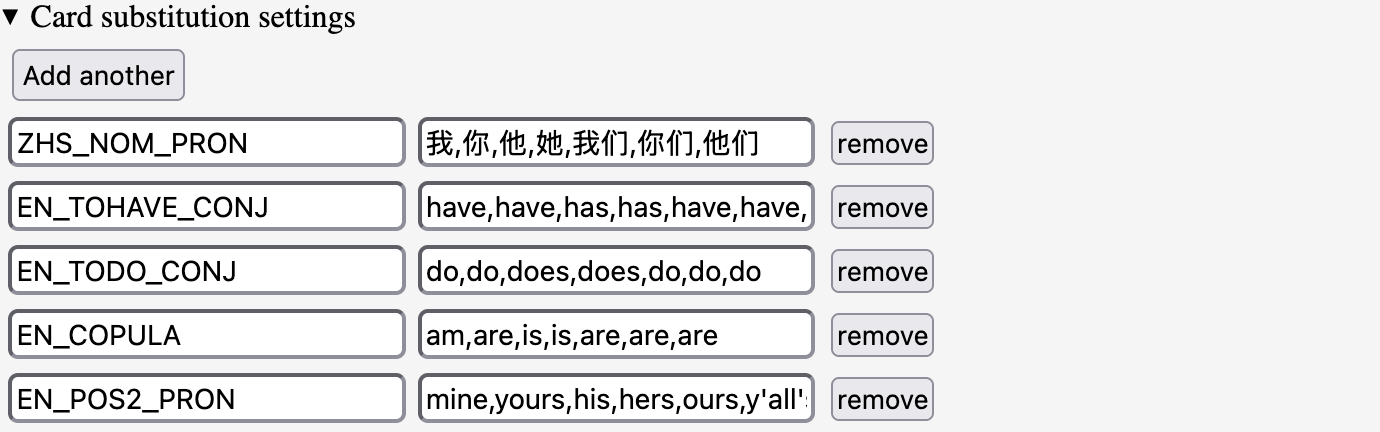
Here, you can see that each entry has a variable in the left text box that is set to refer to a list in the right text box. It can then be used to insert the list into a card prompt:
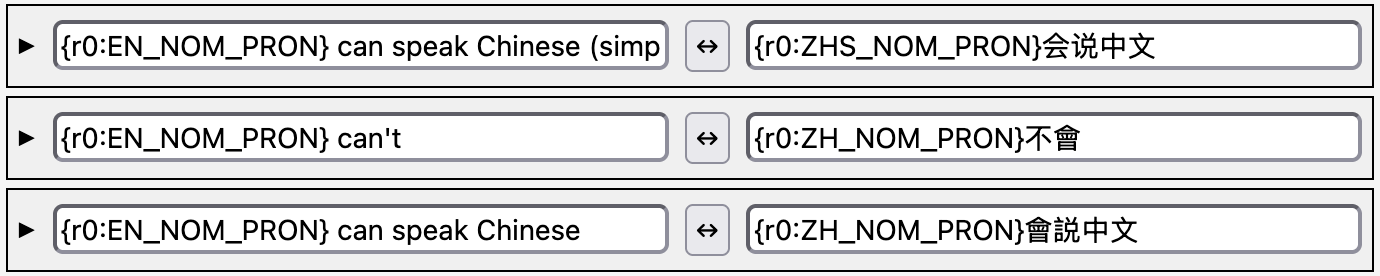
You don’t need to use substitution to use randomized lists, but it can help to visually simplify your card prompts.
Text filter settings:
These settings allow you to control how strictly your answer will be checked against the correct answer. For example, you might care more or less about punctuation or capitalization, depending on your application.
The settings Ignore substrings enclosed in (parentheses) and/or Ignore substrings enclosed in [square brackets] can be used to add notes to your cards’ prompts or answers without having them included as part of the correct value:

If using these in this manner, you’ll probably also want to enable Ignore leading and trailing spaces.
Omit cards with the following tags:
This setting allows you to specify tags which will be filtered out from your new and/or due cards lists.
Two-sided cards
Probability of card being reversed and Probability of a reversed card using audio:
Each of these take a number between 0 and 1, 0.5 by default, and will determine how likely a card is to be reversed and/or be an audio-only card.
Don't reverse two-sided cards during initial study:
When using two-sided cards in a Spaced repetition deck, this setting will disable the reversal feature until cards graduate out of the “new” stage.
Spaced-repetition
Max new cards to study at once:
This setting will determine the size of the set of new cards you want to study before moving to the next set. This is handy if you add a large number of new cards at once, as studying them all concurrently can be challenging.
Initial interval:
The initial interval of a new spaced repetition card. That is, the amount of time between when it is studied for the first time (as a new card) between when it comes due for the first time.
Correct factor:
The factor by which a card’s interval is multiplied when it is answered correctly. Should be greater than 1, so that correctly answered cards are pushed off further and further into the future.
Incorrect factor:
The factor by which a card’s interval is multiplied when it is answered incorrectly. Should be less than 1, so that incorrectly answered cards become due more quickly and are studied more often.
If something breaks
There is no stable release of Pfeil yet, so things are sometimes wonky, broken, or unintuitive. If you find a bug and wish to report it, please create an issue on GitHub. Pfeil was designed to be open-source, so you are welcome to submit a pull request with a fix yourself, if you’d like! Otherwise, we will try to re-create the bug and fix it when we have a chance.